How to Set Up a Resin Art Workspace at Home | Fun & Friendly Beginner Guide
How to Set Up a Resin Art Workspace
at Home
There’s nothing like diving into resin art… until you realize you’ve glued your phone to the dining room table.
(Yes, that happened to me. Lesson learned: never work on your nice furniture, and ALWAYS keep your phone in a dry safe zone.)
A dedicated workspace keeps you safe, organized, and sane — and saves your furniture.
Here’s how to set up your own cozy resin art corner at home, so you can focus on creating beautiful pieces instead of battling dust, spills, and chaos.
Choosing the Perfect Spot
Start by scouting your home for a spot that’s quiet, away from pets and kids.
Look for good airflow, like a room with a window you can open or where you can install a fan.
Resin loves a steady, dust-free environment and hates humidity and sunlight.
A sturdy, flat table is non-negotiable. Resin is self-leveling, so a slanted table means lopsided coasters (been there). If you don’t have a spare table, a foldable one works just fine, just make sure it is level..
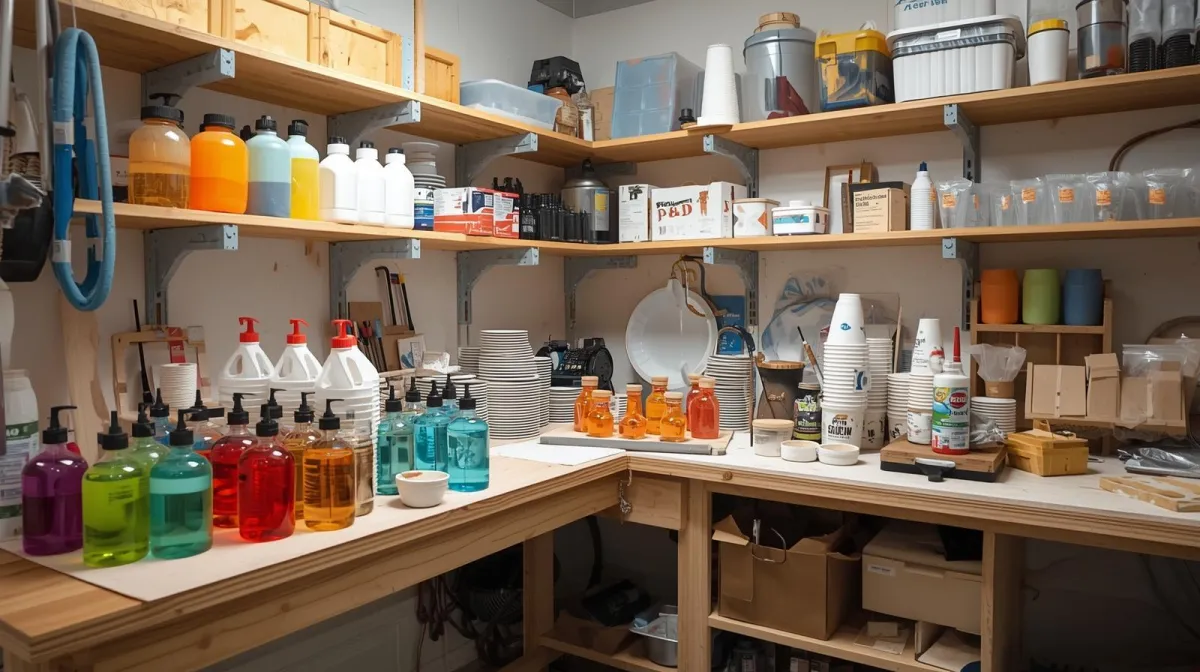
Plan for storage early. Shelves, bins, or even a rolling cart keep your space tidy and your supplies close by. You’ll thank yourself later when you’re not hunting for your favorite pigment at midnight.
Small space? No problem. I once worked out of a closet with a fold-down table and a small fan.
It wasn’t glamorous, but it worked — and my phone survived.
Must-Have Tools and Supplies
When I started, I thought I needed everything under the sun.
I ended up with three heat guns and no decent silicone mat. Don’t be like me.
Here’s what you really need to get going:
A level, sturdy table with a silicone mat to protect it.
Mixing cups, stirring sticks, nitrile gloves.
A heat gun or small torch for bubbles.
Paper towels and alcohol wipes for quick cleanup.
Pigments, glitter, and molds stored in labeled, clear containers.
A beginner kit is a great way to start. It usually includes resin, hardener, cups, gloves, and a few molds — enough to get your feet wet without overspending.
Keep all tools within reach while you work.
Nothing’s worse than dripping resin across the room because your spatula was hiding in a drawer.
Safety First – Ventilation & PPE
Here’s a confession: early on, I skipped the respirator.
Then I got a headache so fierce I swore I’d never skip it again.
Safety isn’t optional with resin. Always wear nitrile gloves, protective glasses, and a proper respirator mask designed for organic vapors.
Work in a well-ventilated space. Open windows, run a fan, or invest in a small exhaust fan to pull fumes out.
Keep your workspace off-limits to snacks and drinks (trust me, resin-coated coffee mugs are not cute).
Have a lidded trash bin nearby for used gloves and cups.
Keep your room at 70–75°F (21–24°C) for the best curing results. A small space heater or fan can help keep things steady.
Keeping Things Organized (and Sane)
Resin art is fun. Digging through a mountain of clutter to find your glitter? Not so much.
Create zones: one for mixing, one for pouring, one for curing, and one for cleanup.
I use a pegboard for tools and stackable bins for pigments and dried flowers.
Label everything. There’s nothing more frustrating than guessing whether that jar is white pigment or mica powder.
Set up a small cleaning station with wipes, paper towels, and rubbing alcohol. Clean as you go to save your sanity later.
Keep your curing area separate and covered to protect pieces from dust. A clear plastic storage bin flipped upside down makes a great dust cover.
The All-Important Curing Zone
Curing resin is like babysitting — it needs peace and quiet.
Set up a stable, dust-free spot just for curing. Keep it out of high-traffic areas to prevent curious pets or kids from “checking on it.”
Cover pieces with a clear box or plastic container to keep out dust and stray hairs. (Yes, I’ve had a beautiful flower piece ruined by a single rogue hair.)
Maintain consistent room temperature in your curing zone. A small heater helps in winter, while an air conditioner helps in summer.
If you’re short on space, invest in stackable drying racks with dust covers. They save space and keep projects safe.
Lighting and Temperature – The Unsung Heroes
Good lighting is a game-changer. Early on, I thought my pieces were perfect — until I saw them in daylight.
Use bright, daylight-balanced lamps. They help you spot bubbles, dust, and color issues before it’s too late.
Avoid harsh overhead lights that cast shadows. An adjustable desk lamp works wonders.
Keep your workspace at a steady 70–75°F (21–24°C). Fluctuating temperatures can cause resin to cure unevenly.
In humid areas, consider a small dehumidifier. It keeps your pieces glossy and bubble-free.
Cleaning Up Without Tears
Clean up right after you’re done. Resin is much easier to remove before it cures.
Wipe tools and surfaces with rubbing alcohol and paper towels. Use disposable cups for mixing and let leftover resin harden before tossing it.
Never pour resin down the drain. Trust me, unclogging pipes is not a fun DIY project.
Keep your ventilation equipment clean and check filters often. A tidy space is safer and makes your next session easier.
Daily Quick-Clean Habits
Wipe down surfaces before and after each session.
Check fans and ventilation.
Restock gloves, wipes, and paper towels.
Clean tools right away.
Make sure curing pieces are covered and safe.
Tips for Tiny or Shared Spaces
Use a foldable table you can store away.
Stack bins to maximize vertical space.
Invest in a rolling cart for portable storage.
Dedicate a closet shelf for supplies.
Keep things simple — less clutter means fewer accidents.
Easy Storage Hacks for Beginners
Use clear, labeled containers for pigments and glitters.
Hang tools on a pegboard for easy access.
Keep a dedicated drawer for PPE like gloves and masks.
Store molds flat in dust-free boxes.
Use rolling carts for flexible storage.
Conclusion
A good resin art workspace doesn’t have to be fancy or expensive.
It just needs to be safe, organized, and easy to maintain.
I learned the hard way that shortcuts (like working at the dining table or ignoring ventilation) only cause headaches — literally and figuratively.
Set yourself up for success from the start.
Your future self — and your furniture — will thank you.
*
Here’s a **short bio** for your **Resin Art 101 blog page**, reflecting your experience and drawing from your My Flower Keepsake journey:
---
🌸 I’m Chana, a self-taught resin artist & keepsake maker with years of trial, error & discovery under my belt. I turned my passion into *My Flower Keepsake* — where I preserve life’s most meaningful moments in resin. Through Resin Art 101, I share practical tips, beginner-friendly guidance, and the lessons I wish I knew when I started. Whether you're pouring your first mold or dreaming of selling your art, you're in the right place. 🎨✨](https://storage.googleapis.com/msgsndr/DZXaqlJLOJn0oYspzne6/media/66fac7cb233878c3551bdf82.png)